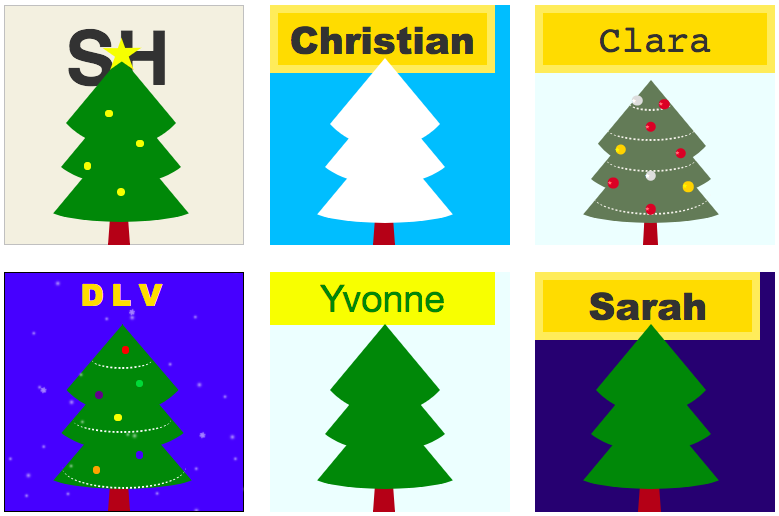
In this tutorial, you’ll learn how to make a holiday tree using shapes made only of HTML and CSS. We’ll be using CodePen to create the trees. You can stop there if you’d like to just keep it for yourself, or, if you’d like, you can pull down my repository from GitHub and add your tree to the forest.
This tutorial is based on a CSS Christmas Tree tutorial from CSS Viking. You can find the original here!
SET UP
If you don’t plan on interacting with my GitHub repository, then all you need is a browser (I recommend Google Chrome). That’s it!
If you are planning on making a pull request to my repo (you really should! it’s great practice for contributing to open source, which looks good on your resume), you’ll need the following:
- Git installed on your computer: we need git for version control, and to allow us to interact with GitHub.- If you have a Mac: it may have come standard with your computer. To check, open up a Terminal window at type git. If you get an error message, you will need to install it. If you get a list of commands returned to you, then you have git installed and are ready to proceed to the next instruction!- If you don’t have a Mac or it is not installed, follow the instructions for your operating machine on: https://git-scm.com/book/en/v2/Getting-Started-Installing-Git
- A GitHub account: GitHub allows us to all work on the same project without stepping on each other’s toes. If you don’t already have one, go to https://github.com/ and sign up
- A text editor installed on your computer: we’ll need someplace to edit our code! There are several free options available for download including Notepad++, Atom, Brackets, and Sublime Text. I’ll be using Sublime Text. Google any of the ones listed and follow download instructions for your operating system.
RESOURCES
CodePen – CodePen allows us to play around with bits of HTML and CSS without messing with the text editor.
Holiday Trees Repository – Here’s the GitHub repository I was just talking about! This is where the code lives. You’ll be forking and pulling down this repo onto your computer to get the code we’re working with. I’ll walk you through that in the tutorial portion.
Holiday Trees Website – This is the live app where all your trees will live! It’s set to automatically deploy, so every time I merge one of your beautiful trees to the master branch of my GitHub repository, it will show up here.
Mozilla Developer Network (MDN) CSS – If you aren’t sure about a property, or want more clarification on anything CSS related, this is your go-to. Use the search bar feature, or look for “MDN CSS” when you’re Googling anything CSS. Try to avoid w3Schools because it’s not always the most up-to-date.
CSS Tricks – Another awesome website for all things CSS is CSS-Tricks. They’ve got a tutorial for everything under the sun.
LET'S MAKE SOME TREES!
We can get started by pulling up CodePen.io on your browser. If you don’t have an account, it’s not necessary for this tutorial, but you may find it helpful as you can save your progress for later if you have an account. Once you get to CodePen, click “New Pen” in the upper right hand corner.
Note: As we go, I’ll be adding new stuff to existing stuff. The new stuff will be in blue.
Create an HTML Container
In your Pen, find the box labelled “HTML” and that’s where we’ll put the the code for the first part of this tutorial. I’ll tell you when we need to start putting things in the CSS container. Nothing will show up for you to see until we get to the CSS, so don’t worry if you don’t see anything! You’re not supposed to yet.
First we’ll create a div container for the entire tree to go in:

Remember to create an id on this tree with your initials or name in it. It needs to be unique so that when we combine everybody’s trees on the same page, our styles don’t overlap. In this case, my id is “mkm” – so replace those letters with your own name or initials. Even better, replace it with your GitHub username so you know it’s unique!
Add the HTML for the Trunk
Inside of the tree div class, create another div element with the class “trunk”. We don’t need to add an id to this class since it’s contained within a parent element that has a unique id. You’ll see where this is important when we get to the CSS.

Add the HTML for the Branches
Inside of the tree div class, and under the trunk div class, create three divs with the class “branch”. These will represent the individual triangles that make up the green tree branches:

We need a way to differentiate between these three branches, so add classes “top”, “middle”, and “bottom” so there is one branch of each:

Add Your Name
We’ve got all the main elements for the tree set up to apply our CSS to, but we still need a way to differentiate your tree from other’s trees. Let’s add your name!
Here, you’ll notice I also added my name (“MK”) inside of the div. Replace that with your own name or initials!

Style the Trunk
The trunk and the branches are all going to be basically triangles. Creating a CSS triangle is interesting because it’s not as straightforward as creating a box, we’ll have to do some adjusting to get it to be a triangle. What we’re looking for is a transparent box that has styled borders. The borders meet each other at angles. So if we make the border thick enough, and some sides transparent, what we have left is a triangle. Here’s a short animation to demonstrate the point: https://css-tricks.com/snippets/css/css-triangle/
We’re now switching to the CSS box in your Pen, and will remain here for the rest of the time that we’ll be using CodePen.
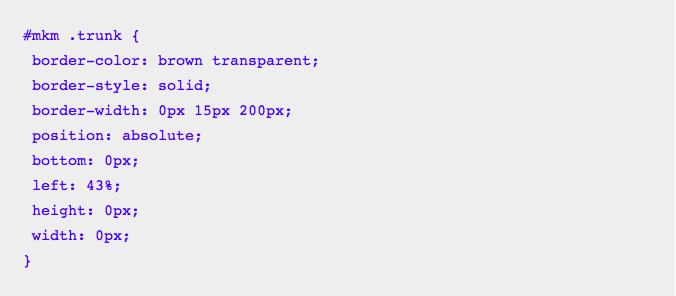
Remember to replace the “#mkm” with your unique id that you used in creating your first HTML container! It needs to be preceded by a “#” – that’s what designates it as an id – but what comes after it should be your name, initial, or GitHub username (whichever you used in your HTML). If you don’t change it to make it the same, you won’t see your tree!
There’s a lot going on here, so let’s break this down:
- border-color: brown transparent;
- When there’s only two properties specified, the first one indicates the top&bottom, and the second – right&left. So we’re still setting a property for the right & left border (transparent), and it still responds to other border properties.
- border-style: solid;
- We want the border to be solid, as opposed to dashed or dotted
- border-width: 0 15px 200px;
- There’s three properties here for four sides. In this case, it’s 0 for top, 15px for right&left, and 200px for bottom. This might sound a little counter intuitive at first, but this means our trunk is going to be 200px high, and 15px wide, not the other way around. We’re working with the border thickness.
- position: absolute;
- Positioning is always tricky. “absolute” means that when we give it an offset, it’s offset from it’s parent container. If there isn’t a parent container, it goes to body as the container. However, this position means it’s taken out of the normal “flow” of objects within the container. Click here to read more about positioning: https://developer.mozilla.org/en-US/docs/Web/CSS/position
- bottom: 0px;
- This is part of our positioning – we’re saying we want this 0px from the bottom of the parent container
- left: 43%
- Also part of our positioning, we want our trunk to be about centered in our box, but since the percentage is calculated from the left edge of our trunk and not the center, we have to do a little trial and error to get to 43%. I started with 50% and then adjusted by 1% until I got it looking like how I wanted it to.
- height: 0px;
- Since we’re relying on the border to create a triangle, we need this css shape to have a height and width of 0px and the height and width that you actually see is informed only via the border.
- width: 0px;
- Same logic as height, above.
Style the Branches
Each of the branches share a certain style: they’re all green, sort of triangle-shaped, and centered over the trunk. We can put all these “common” styles in the .branch class so we don’t have to re-write these attributes over and over again for each branch. Making and positioning the triangles for the branches uses the exact same idea as the trunk. Some of the properties were trial and error, so don’t be afraid to change the values and see what it looks like!
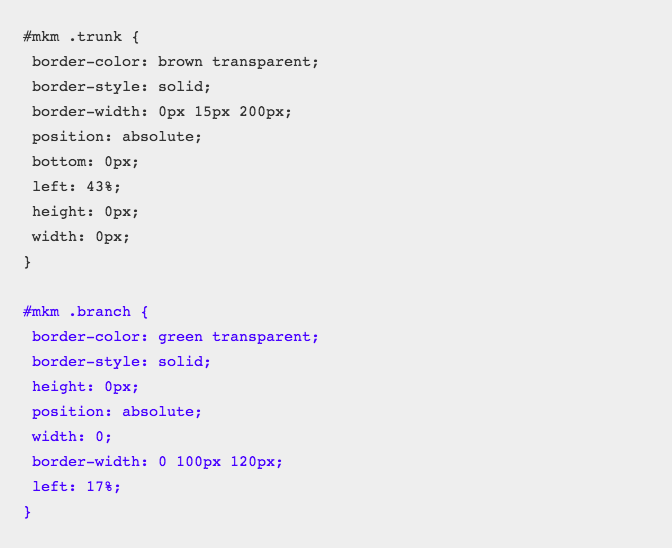
The branch classes bottom, middle, and top should give you a hint as to where we want these branches to end up. We also want them to be stacked on top of each other and each one to be a bit smaller than the one below it. In order to do this, we’ll adjust how they’re positioned and how rounded the bottom corners are.
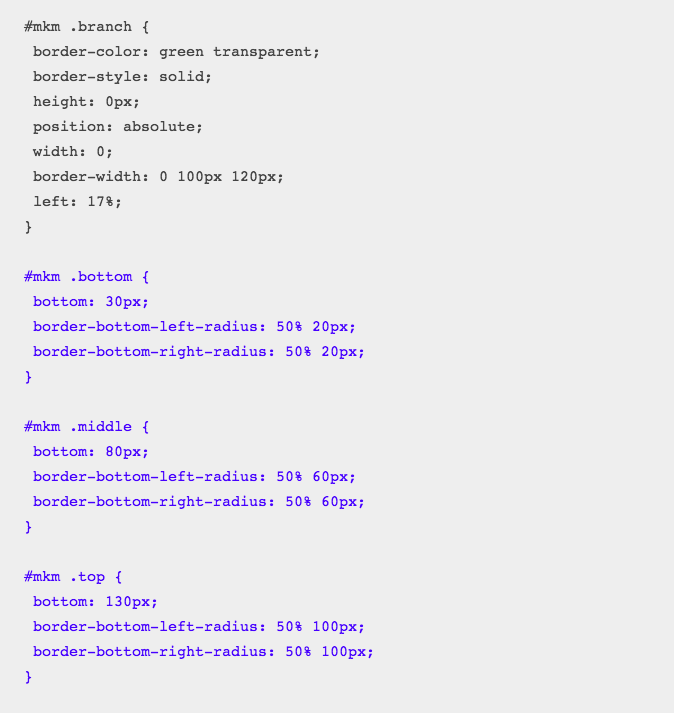
We’ll break down the .bottom class, but the same ideas apply to .middle and .top:
bottom: 30px;
- We want this branch to be closest to the bottom of all the branches, so employing some trial and error, I arrived at around 30px. The next two were also positioned using trial-and-error, so don’t be afraid to try out lots of different numbers to get a different looking tree. You could make them close together and close to the top of the trunk for a more Dr. Suess style tree!
border-bottom-left-radius: 50% 20px;
- Basically what we’re doing here is telling the bottom left corner of the border to be rounded, but not uniformly rounded, we want sort of an ellipse. “50%” talks about the horizontal radius, and “20px” informs the vertical radius. You’ll really have to play around with these two to make sense of them. The same logic applies the the border-bottom-right-radius. Here’s some more information: https://developer.mozilla.org/en-US/docs/Web/CSS/border-bottom-left-radius
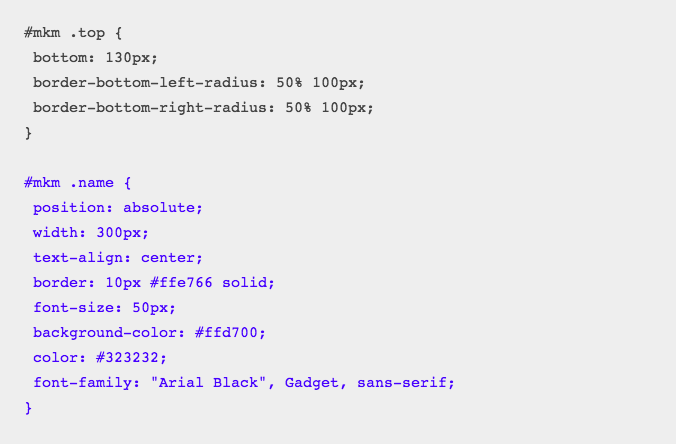
Style Your Name
What we’re doing here is adding your name or initials to the tree so that everybody knows it’s yours!
This element will need to be positioned absolutely, and it should be the same width (mind your border!) as the container.
Feel free to style this as you want – make it your own, make it unique! But make sure everything fits within the bounds of your container. To customize, you could change the font, the color of the text, the color of the background and the border. I challenge you to make this your own!
Add Some Flair!
I challenge you to add your own flair! Add some ornaments, baubles, stars, gifts under the tree – make it your own!
Google things like “How to make a CSS star” or “How to make a CSS circle” to see what kinds of tutorials are out there, or check out the resources links at the beginning of this post.
Remember to keep your HTML elements within your container class, and when you’re doing the CSS, to include your unique id in addition to the class name so the CSS knows exactly where to go.
Ta-da! You've Got a Tree!
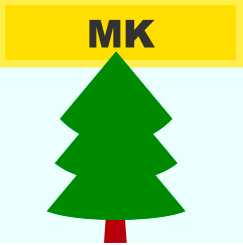
Congrats! You’ve build your very own tree using only HTML and CSS!
Here’s an example of what your tree might look like. If you’ll notice, I added a color background. You can check out my full CodePen and all my code here.
So, if you just want the CodePen, feel free to stop here! However, if you want to make a pull request and have your tree proudly displayed on the farm (aka a website), then continue to follow the instructions to make a pull request and add it!
ADDING YOUR TREE TO THE WEBSITE
If you aren’t familiar with git, GitHub, and the command line, I highly suggest running through TryGit first. It only takes 15 minutes, and will give you a crash course into git and how it interacts with GitHub.
From here on out, we’ll be using git on the command line (or terminal), GitHub.com to interact with the repository, and a text editor of your choice to interact with the code we pull down from GitHub. Keep your CodePen open because we’ll be copying and pasting everything you’ve just done into the text editor.
Fork the Repository
“Forking” makes a copy of the repository on your own account so that you can interact with it. Make sure you’re logged in with your GitHub account and go to https://github.com/mkmckenzie/holiday-trees. Click “Fork” in the upper right-hand corner.
Pull Down Your Forked Repository onto Your Computer
Pulling the repo down to your computer allows you to see and edit the code.
- Go to your forked copy of the repository on GitHub (you can get to it from your profile), and find the green “Clone or Download” button on GitHub. Click the “Copy to Clipboard” button.
- In your terminal or command prompt:- navigate (cd) into where you want the project folder to be (i.e. Desktop, Documents/Code Projects, etc)- use the command git clone [paste your url here]- use the command ls and you should see the name of the repository- use the command cd [name of the repository that you saw when you did the 'ls' command] to change directories into the repository folder
Make a New Branch and Switch to It
Making sure you’re in the directory that your project is in on your terminal (you should be if you followed the last instruction).
Make a new branch by using the command: git checkout -b [name of new branch]
Instead of [name of new branch] use your unique identifier that we used in the HTML, so in my case it would be: git checkout -b mkm which makes a new branch called “mkm” and switches to it.
You are now on a new branch, so any changes you make will be isolated to this branch, and not made to master directly. You can read more about branching here.
Open the Repository in a Text Editor
Open up your next editor of choice and open the files you pulled down. You’ll need to open index.html and css/trees.css. The CSS file is in the CSS folder.
Please note: there is also an index.php file. Don’t edit this file! Find the one with .html in the file name.
You’ll see lots of other files and folders, you won’t need to worry about those. I downloaded the boilerplate from HTML5 Boilerplate, which provided me with the base structure and files that I needed for the website, if you’re curious. You won’t need to download these, however. I’ve already done that for you!
Copy Your Tree From CodePen and Paste it Into the Designated Place in the File
Follow the instructions in the comments of the index.html file and copy and paste your HTML from the CodePen inside of the index.html file. Make sure you paste it below my tree (the id name is “mkm“), and leave the comment (<!-- Add more trees here! -->) intact.
Do the same for the trees.css file – copy your CSS from your CodePen and add them to this file. Follow the instructions in the comments in that file and add yours to the end of the file.
Save your files! Make sure both the index.html and trees.css files are saved.
Check Your Work
Open your index.html file up in a browser. You can do this by opening up your browser of choice, and “File -> Open File”, or by double clicking the file in a finder window. You should see your fully styled tree in the last slot. Make sure no other trees have been affected by your new styles.
If you don’t see your tree, double check that you’ve saved both files and then refresh your browser window. If that doesn’t work, double check that you copied and pasted everything in the right spot.
Add Your Files to Your Local Repository
Now that you’re happy with your work, we need to add and commit your files to your local repository so that we can push them up to GitHub.
On your command line/ terminal, make sure you’re in your repository location and use the command git status to check if anything has changed with your repository. You should see files in green. Next, we need to add files to staging to get them ready for committing to the repository. Use the command git add . to add all files to staging. Don’t forget the . here – that’s shorthand for “add all files”. Now we’re ready to commit our files to the repo. Use the command git commit -m "add tree" to commit them. You can add any message you want inside of the quotes – just make it descriptive of what changes you made. Now when you do git status again – no files should show up. That’s because you haven’t made any changes since your last commit, so we know everything has been committed correctly.
Your changes have now been recorded on your local git repository, but we want to push these changes up to GitHub so that everybody can see your tree.
Push Your Branch Up to Your Forked Version of the Repository
In your open command line/terminal, double check the name of the branch you’re on by using the command git branch – an asterisk should appear next to the name of the branch you’re on. We’ll need the name of the branch to push to GitHub.
Use the command git push origin [NAME OF YOUR BRANCH] to push up changes. So, for example, my branch name was mkm so I’d use the command git push origin mkm (no brackets).
Your command line may prompt you for your GitHub username and password, follow the instructions on the command line until the push has completed.
Make the Pull Request
Go to my original repository, and refresh the page. You should see a orange-yellow banner with a green button that says “Create New Pull Request”. If you see this, click that button.
If you don’t see that banner, you’ll have to create the pull request manually. To do this, click the “Pull Requests” tab. Click “New Pull Request”. You’ll need to compare across forks, so click the link in the sentence below “Compare Changes” that says “… you can also compare across forks”.

Leave “base” as-is – it should be set to mkmckenzie/holiday-trees. Next to “head fork”, click the drop down and change it to your forked version of the repository. It should read “[your github username]/holiday-trees” and then change the branch (next to “compare”) to the name of the branch that you committed your changes to. Mine was “mkm“, so I’d change the “compare” dropdown to that.
Now, you should see a text box where you can add a note to your pull request. I’ll only accept pull requests that have the following, so please add the note!
Requirements:
Your parent container must be square
You must have added something new and unique to your tree
You must add your name or initials to the name box
Example:
Container is a square – 350x350px
I added a star to the top!
Initials added: MK
Once you’ve added the note, complete the pull request by clicking the green button. I’ll get a notification once you’ve done this to review and approve, or I’ll leave a comment if you need to fix something. Once I merge them into master, they’ll show up on the website!
Congrats! You’ve created a tree using HTML and CSS and made a pull request!
That’s awesome!
Hope you enjoyed the tutorial! Please leave a comment if you have any questions, comments or feedback.
Happy New Year!
Sources
CSS Viking – CSS Christmas Tree
HTML5 Boilerplate – The web’s most popular front-end template
This content was originally posted on Mary-Katherine's blog.


